
Saturday, August 13, 2022


Tuesday, September 27, 2011
Best Reasons to Own Cooking Books
I found this article on O.co (a.k.a. Overstock.com). I like to find each and every way to justify my vast collection of cooking books. I have two cooking passions, no make that three four.
1. Collecting (That sounds better than buying.)
2. Reading
3. Cooking
4. Eating
Each equally pleasurable.


1. Collecting (That sounds better than buying.)
2. Reading
3. Cooking
4. Eating
Each equally pleasurable.
Best Reasons to Own Cooking Books
With the rise of cooking culture on the Internet, people seem to be forgetting why cooking books are so valuable. While it's convenient to be able to look up recipes online, cooking books are still the choice of serious chefs and bakers everywhere. Cooking books provide an enormous amount of irreplaceable benefits in the kitchen. If you're considering purchasing one, look at the article below to learn the best reasons to own cooking books.Owning Cooking Books:
-
Have them where you want them:
One of the biggest conveniences of cookbooks is that they can be placed
near your cooking area and remain there. When it comes time to get
cooking, you won't have to run back and forth to look for recipes or
measurements. Having a cooking book on hand while you mix and measure
ingredients will help you increase the quality of the food you prepare,
and it will also help decrease stress in the kitchen.
-
Make your mark: Cooking
books are terrific because they allow you to mark them up. Try a recipe
and think something could be added next time? Write yourself a reminder
in the margin. Find that a recipe doesn't work well at your altitude?
Alter the instructions with a pen to make sure you get it right on your
second try.
-
An issue of trust: With
cooking books, it's possible to find recipes from chefs you trust.
Instead of having to rely on undependable sources, you can look for
volumes of recipes and cooking tips from renowned experts in the field.
From celebrity chefs to classic cooks, it's easy to find cookbooks from
trusted names.
-
Getting to know you:
Another worthwhile element of cooking books is the chance you have to
get to know them. As time passes and you try more and more recipes from
your cooking book, you'll be able to get a feel for how the book works
for your style of cooking and you'll be able to use the knowledge to
improve the recipes to your liking.
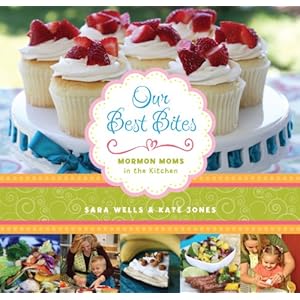
Here is my latest favorite. Our Best Bites. Great recipes. Great pictures. Great taste.
Saturday, April 2, 2011

Tuesday, February 8, 2011
Helloooooooooooooo - I'm Back!!
 |
| Fresh corn on the grill. |
The Recipe:
Shuck fresh corn.
Put in plastic bag and sprinkle with EVOO
(extra virgin olive oil) enough to lightly cover each kernel.
Put on a hot grill - grill for 6 minutes each side.
Season with favorite seasonings. ie: salt , pepper, Johnnys seasoning, Mrs. Dash. etc...
Wrap in foil for 10 - 15 minutes. Eat.
 |
| Grilled Corn in Foil |
Monday, July 12, 2010
Food Photography Workshop

Last Saturday I was able to attend a Food Photography Workshop taught by Quinn Curtis.
She is Utah's premiere culinary photographer who captures the essence of food and
her photo's are lick-a-licious.
I am so excited that I get to attend a couple other of her classes about color,
composition and natural lighting.
Did you know people and food photograph differently?
Well, they do.
I am hoping my food photography gets better with each image.
I also hope I remember to take photos before I eat the food.
Check out her website and join me for a class:
LimeLightFoodPhotography.com
Thursday, March 18, 2010
Blog-o-licious - Banana Bread
Yes, it is true. My life revolves around food. Dinner time is a sacred ritual at our house. I love those I love gathered around my table to break bread with me.
I don't eat to live - I live to eat. I take cookbooks to bed with me to read. I love to look at food pictures. In my next life I know I will be a famous chef or the next Martha Stewart. Until then here is my favorite recipe for banana bread.
Banana Bread
Makes 3 - 8X4 inch pans
1 cup butter
1 cup white sugar
1 cup brown sugar
3 cups very ripe bananas - about 6
4 large eggs
1 teaspoon salt
1 teaspoon soda
4 cups flour
1 cup chopped nuts - optional
Cream butter and sugar.
Add the bananas. Mix very well so the bananas get mashed.
Add the eggs. Mix well.
Stir in salt and soda.
Add flour. Stir well without over mixing.
Pour into prepared pans (buttered or sprayed with PAM)
Let sit for 20 minutes on counter top. (I have no idea what this does but it makes a difference.)
Bake in preheated 350° oven on center rack for 45 minutes to 1 hour.
Check with toothpick to see if done. This means stick a toothpick in the center on one loaf - pull it out - if it is clean it is done. If there is dough on it cook it longer.
Take out of oven and let cool 10 minutes on cooling rack. Remove from pans.
Contain yourself from devouring until cool.
After completely cool - store in food grade plastic bag.
These loaves freeze well- if they last that long!
I don't eat to live - I live to eat. I take cookbooks to bed with me to read. I love to look at food pictures. In my next life I know I will be a famous chef or the next Martha Stewart. Until then here is my favorite recipe for banana bread.
Banana Bread
Makes 3 - 8X4 inch pans
1 cup butter
1 cup white sugar
1 cup brown sugar
3 cups very ripe bananas - about 6
4 large eggs
1 teaspoon salt
1 teaspoon soda
4 cups flour
1 cup chopped nuts - optional
Cream butter and sugar.
Add the bananas. Mix very well so the bananas get mashed.
Add the eggs. Mix well.
Stir in salt and soda.
Add flour. Stir well without over mixing.
Pour into prepared pans (buttered or sprayed with PAM)
Let sit for 20 minutes on counter top. (I have no idea what this does but it makes a difference.)
Bake in preheated 350° oven on center rack for 45 minutes to 1 hour.
Check with toothpick to see if done. This means stick a toothpick in the center on one loaf - pull it out - if it is clean it is done. If there is dough on it cook it longer.
Take out of oven and let cool 10 minutes on cooling rack. Remove from pans.
Contain yourself from devouring until cool.
After completely cool - store in food grade plastic bag.
These loaves freeze well- if they last that long!
Friday, March 5, 2010
Check out my new web site!
The spousal unit and I have been busy launching a new web site --
www.howtomakehomemadebread.com
I have had many requests for my Everyday Bread recipe, I want to share but I also want to make sure it is made with proper techniques. I have been teaching classes and now we are going live (sort of) on the internet.
It has been so much fun - even as we speak I am developing a recipe for sandwich rolls.
I will let you know of the outcome. So far the dough feels fan-freakin-tastic!
The web site will be featuring videos showing technique as well as delicious recipes.
We have been shooting episodes and soon it will be available to view online.
I have some great testimonials from students - see if you recognize anyone!
If you have any requests please let me know. Happy bread making!
Remember-
Bread making is an art.
Practice makes progress.
Progress makes mastery!
www.howtomakehomemadebread.com
I have had many requests for my Everyday Bread recipe, I want to share but I also want to make sure it is made with proper techniques. I have been teaching classes and now we are going live (sort of) on the internet.
It has been so much fun - even as we speak I am developing a recipe for sandwich rolls.
I will let you know of the outcome. So far the dough feels fan-freakin-tastic!
The web site will be featuring videos showing technique as well as delicious recipes.
We have been shooting episodes and soon it will be available to view online.
I have some great testimonials from students - see if you recognize anyone!
If you have any requests please let me know. Happy bread making!
Remember-
Bread making is an art.
Practice makes progress.
Progress makes mastery!
Tuesday, November 10, 2009
Blog-o-licious 2nd Audition for Dinnner Rolls
So far this recipe is coming in first - it takes a little longer in raising time - but worth the effort.
Mally said she had one today in Seminary and it was delicious! Spousal Unit said he couldn't tell the difference between the rolls.
I make this in my Kitchen Aid
Dinner Rolls
Start with paddle.
In bowl add:
1 TBS yeast
1 teaspoon sugar
in 1/2 cup warm water for 10 minutes
Barely simmer 1 cup milk ( I use the microwave)
Add: 1 cube butter cut up
Add :
½ cup sugar
1 teaspoon salt
When cooled add to yeast mixture.
Gradually add
3 beaten eggs
3 cups flour, until batter is very sticky
Mix for five minutes to develop the gluten.
Change the paddle to the dough hook.
Gradually add about 3 + cups flour until dough is very soft. Mix well . This is about 3 minutes. The dough looks silky and smooth.
Cover with towel and let raise 1 ½ hours.
Punch down. Let rest for 5 minutes.
Shape into rolls, dip in melted butter on cookie sheet.
Cover with a towel and let raise 1 ½ hours.
Bake at 375̊ for 11 minutes.
This makes 24 nice size rolls. I put them on a cookie sheet 4 x 6.
Mally said she had one today in Seminary and it was delicious! Spousal Unit said he couldn't tell the difference between the rolls.
I make this in my Kitchen Aid
Dinner Rolls
Start with paddle.
In bowl add:
1 TBS yeast
1 teaspoon sugar
in 1/2 cup warm water for 10 minutes
Barely simmer 1 cup milk ( I use the microwave)
Add: 1 cube butter cut up
Add :
½ cup sugar
1 teaspoon salt
When cooled add to yeast mixture.
Gradually add
3 beaten eggs
3 cups flour, until batter is very sticky
Mix for five minutes to develop the gluten.
Change the paddle to the dough hook.
Gradually add about 3 + cups flour until dough is very soft. Mix well . This is about 3 minutes. The dough looks silky and smooth.
Cover with towel and let raise 1 ½ hours.
Punch down. Let rest for 5 minutes.
Shape into rolls, dip in melted butter on cookie sheet.
Cover with a towel and let raise 1 ½ hours.
Bake at 375̊ for 11 minutes.
This makes 24 nice size rolls. I put them on a cookie sheet 4 x 6.
Wednesday, October 7, 2009
Blog-o-licious - Dinner Roll Auditions
I have been teaching bread making classes to my ward and other people in the neighborhood.
The request for the upcoming holidays are Dinner Rolls.
I am auditioning recipes. My first recipe I got from my sister a long time ago.. It is quite delicious and fast.
As with any bread recipe developing the gluten is key. Developing gluten is done by kneading the dough - by hand or by mixer, until it is silky and smooth. You can purchase gluten to add to the dough- but it is NOT necessary - let me repeat that - NOT necessary.
Rolls
Mix: 1 3/4 cup warm water
1/2 cup sugar
1/2 cup oil
3 Tablespoons yeast
Cover and let sit for 15 minutes.
Add:
1/2 Tablespoon salt ( 1 1/2 teaspoons)
2 eggs - lightly beaten
5 cups flour - white or whole wheat (mixed)
Add flour 1/2 cup at a time - make a batter - beat until smooth. Gradually add the rest of the flour making a soft dough.
Shape into rolls. Put onto jelly-roll pan that has been sprayed with PAM.
Raise 20 - 45 mintutes.
Bake 375° for 15 minutes.
These take about an hour and a half to two hours. I made a dozen large rolls and some yummy cinnamon rolls.
Speaking of Cinnamon Rolls - here is recipe for really really really yummy, can't- stop -eating Cream Cheese Frosting.
Beat 8 oz. cold cream cheese (not rock solid, but it means you can use it straight out of the refrigerator) with 5 Tbsp. softened butter and 2 tsp. vanilla until combined.
Gradually add 2 c. powdered sugar that has been sifted after measuring.
Continue to add more sifted powdered sugar until you reach a consistency and sweetness that fits your taste.
No softening the cream cheese (though you do have to plan ahead with the butter). No whipping to a certain point that occurs for all of ten seconds before it's ruined. The hardest part is not eating the frosting straight from the bowl by the spoonful.
The request for the upcoming holidays are Dinner Rolls.
I am auditioning recipes. My first recipe I got from my sister a long time ago.. It is quite delicious and fast.
As with any bread recipe developing the gluten is key. Developing gluten is done by kneading the dough - by hand or by mixer, until it is silky and smooth. You can purchase gluten to add to the dough- but it is NOT necessary - let me repeat that - NOT necessary.
Rolls
Mix: 1 3/4 cup warm water
1/2 cup sugar
1/2 cup oil
3 Tablespoons yeast
Cover and let sit for 15 minutes.
Add:
1/2 Tablespoon salt ( 1 1/2 teaspoons)
2 eggs - lightly beaten
5 cups flour - white or whole wheat (mixed)
Add flour 1/2 cup at a time - make a batter - beat until smooth. Gradually add the rest of the flour making a soft dough.
Shape into rolls. Put onto jelly-roll pan that has been sprayed with PAM.
Raise 20 - 45 mintutes.
Bake 375° for 15 minutes.
These take about an hour and a half to two hours. I made a dozen large rolls and some yummy cinnamon rolls.
Speaking of Cinnamon Rolls - here is recipe for really really really yummy, can't- stop -eating Cream Cheese Frosting.
Beat 8 oz. cold cream cheese (not rock solid, but it means you can use it straight out of the refrigerator) with 5 Tbsp. softened butter and 2 tsp. vanilla until combined.
Gradually add 2 c. powdered sugar that has been sifted after measuring.
Continue to add more sifted powdered sugar until you reach a consistency and sweetness that fits your taste.
No softening the cream cheese (though you do have to plan ahead with the butter). No whipping to a certain point that occurs for all of ten seconds before it's ruined. The hardest part is not eating the frosting straight from the bowl by the spoonful.
Bread Making 101
Check out my bread making site - a work in progress - for my bread I make on a weekly basis.
www.thebreadsnob.blogspot.com
www.thebreadsnob.blogspot.com
Friday, October 2, 2009
Blog-o-licious Favorite Chili
When the temperature plummets 40 degrees in 24 hours here in Utah it is time to pull out a favorite recipe that will take the chill away. (Especially when the furnace and fireplace are still on summer vacation.!)
Auntie L’s Favorite Chili
Soak 3 cups dry red beans in 6 cups water overnight.
Drain.
Add fresh water to cover beans and cook 1 ½ hours.
Drain.
Add:
1 16 oz. can tomato sauce
1 16 oz. can stewed tomatoes
1 ½ cup ketchup
1/4 cup lemon juice
1/4 cup brown sugar
1 cup each coarsely chopped; celery, onion, green pepper, red pepper
1 small bay leaf
1 tablespoon chili powder
1 ½ tsp. salt
2 Tablespoons Worcestershire sauce
2 teaspoons cumin
1 ½ teaspoon dry mustard
1 lb. Hamburger - cooked and drained
Simmer for 1 - 2 hours.
Auntie L’s Favorite Chili
Soak 3 cups dry red beans in 6 cups water overnight.
Drain.
Add fresh water to cover beans and cook 1 ½ hours.
Drain.
Add:
1 16 oz. can tomato sauce
1 16 oz. can stewed tomatoes
1 ½ cup ketchup
1/4 cup lemon juice
1/4 cup brown sugar
1 cup each coarsely chopped; celery, onion, green pepper, red pepper
1 small bay leaf
1 tablespoon chili powder
1 ½ tsp. salt
2 Tablespoons Worcestershire sauce
2 teaspoons cumin
1 ½ teaspoon dry mustard
1 lb. Hamburger - cooked and drained
Simmer for 1 - 2 hours.
Thursday, August 13, 2009
Miles

Here is Miles, my cute little-ish newest Grand-Nephew. Entering the world at almost 11 lbs., he is a delight to his favorite Auntie L.


Monday, July 27, 2009
Aunt Lucele Has a 90th Birthday Party


Aunt Lucele and her kid-lets. Aunt Lucele and siblings and neice Ronda.
Thursday, May 28, 2009
Blog-O- Licious Creamy Cucumber and Dill Sauce

This is one of the best meals we had in Hawaii.
Creamy Cucumber and Dill Sauce
1/2 c. shredded cucumber, no peel or seeds
1/4 c. sour cream or yogurt (fat-free)
1/4 c. mayonnaise (light)
1/2 Tbsp. minced parsley
1/2 Tbsp. dill weed
dash salt to taste
Splash of lemon juice
Pepper to taste
Mix and chill.
My favorite way to fix salmon:
Put salmon on tin foil large enough to make a pocket.
Squeeze lemon juice and/or orange juice liberally over salmon.
Sprinkle "Johnny's Seasoning" on top.
Tightly wrap so salmon will poach.
Put on preheated grill and cook until 'fleshy' look is gone.
Do not overcook.
Serve with Creamy Cucumber Dill Sauce, seasonal flowers and grilled veggies.
Monday, May 25, 2009


Subscribe to:
Posts (Atom)
